
This article explains the first step in creating a new assessment.
This article covers:
- Adding a new assessment
- Assessment purpose
- Which details to fill in
- Advanced assessment options
How to add a new assessment
To create a new assessment, click Add assessment at the top of the Assessments Overview screen. The new assessment dialog will open.
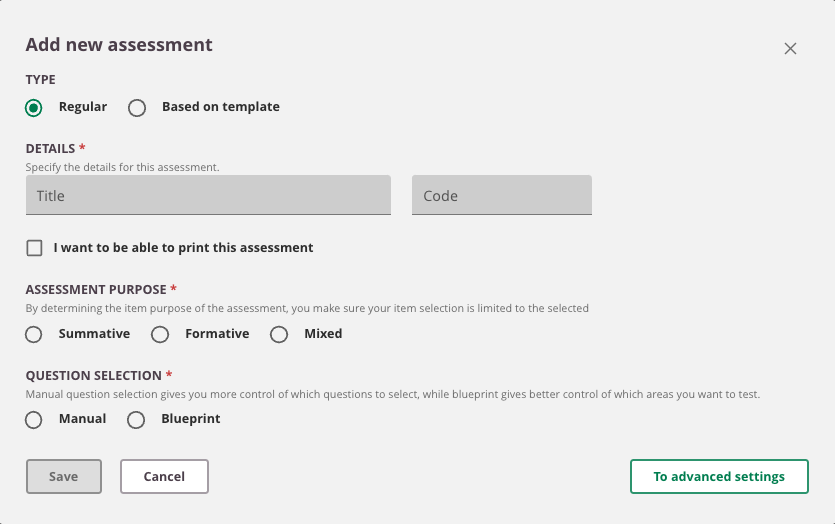
- Type
- Regular — Creates a completely new assessment.
- Based on template — Creates an assessment based on an existing one, copying the same assessment options and publish settings. Questions must still be selected.
- Enter a title for the assessment.
- Enter a code. The code identifies the assessment and does not need to be unique across the platform.
- Select I want to be able to print this assessment if required.
- Select the purpose: Formative, Summative, or Mixed.
- Choose question selection method: Manual or Blueprint.
- Click Save to open the new assessment, or click Show advanced options.
This dialog can be reopened at any later step to adjust settings.
Advanced settings
These options are not mandatory, but we recommend reviewing them.
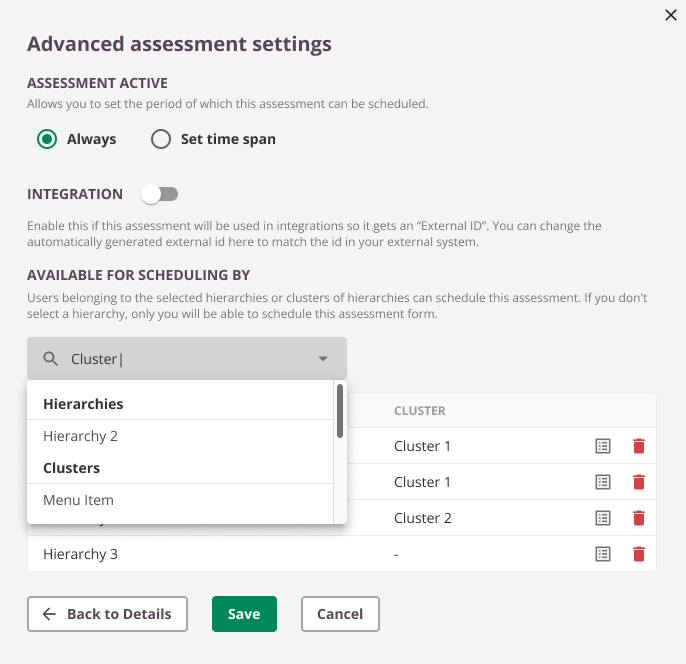
Assessment active
- Always: the assessment is always available for scheduling.
- Set timespan: the assessment is available for scheduling only within a specified period.
Example: If an assessment can only be scheduled within 2023, set a timespan for that year. From 1 January 2024, schedulers will no longer be able to select it.
Integration (External ID)
When certain actions are automated via an integration, a unique identifier is required.
For example, when creating a schedule via integration, the system needs to know which assessment to schedule. This unique ID is used for that purpose.
Available for scheduling by
Add one or more hierarchy groups or clusters. Users belonging to the selected hierarchies or clusters can schedule this assessment. If no hierarchy is selected, only you will be able to schedule it.

After selecting hierarchies or clusters, click the preview icon to view which users will have scheduling access.
Users added to Available for scheduling can create a schedule for this assessment but cannot see schedules already created by other users. To view schedules from other users, those schedules must be shared at schedule level.
More on assessment purpose types
Formative assessment
When Formative is selected, only questions tagged as formative are shown in question selection (manual) or made available (Blueprint).
Formative assessments are primarily for practice purposes. Selecting this type limits the question selection to formative items.
Summative assessment
When Summative is selected, only questions tagged as summative are shown in question selection (manual) or made available (Blueprint).
Summative assessments are high-stakes assessments such as exams. Selecting this type limits the question selection to summative items.
Mixed assessment
When Mixed is selected, questions with a formative tag, summative tag, or no tag are all available in question selection.
This type is a combination of formative and summative and enables selection of both item types.
Assessment type q&A
What happens with items that have no purpose selected?
Items without a purpose will only be available for Mixed assessments.
What if I want to change from Formative to Mixed?
This is not possible. Create a new assessment with the correct purpose and items. Archive the old one when done.
Where can I see which type my assessment is?
This is visible on the assessment overview page and when previewing the assessment as an author.
Next step
Once the initial details are complete, the system opens the new assessment for further setup.