
Using labels for item management in your Library
Labels are a useful tool for organising items within your collections. The Library provides two kinds of labels:
- Individual Collection Labels (shown in blue)
- System Labels (shown in grey)
Personal labels vs system labels
Any user with access to a collection can create personal labels. Both types are customisable and searchable.
Key differences:
| Personal | System | |
|---|---|---|
| Created | Within a specific collection | Via the admin panel |
| Modified/deleted | Within a specific collection | Via the admin panel |
| Managed by | Any user with access to the collection | The system administrator |
| Available | Unique to a specific collection | Available across all collections |
System labels
System labels are administered by system administrators and can be used across collections. Regular authors cannot modify or remove these labels.
Authorised users can add system labels via Admin → Labels. Access is configured under Admin → Roles → Site → Labels.
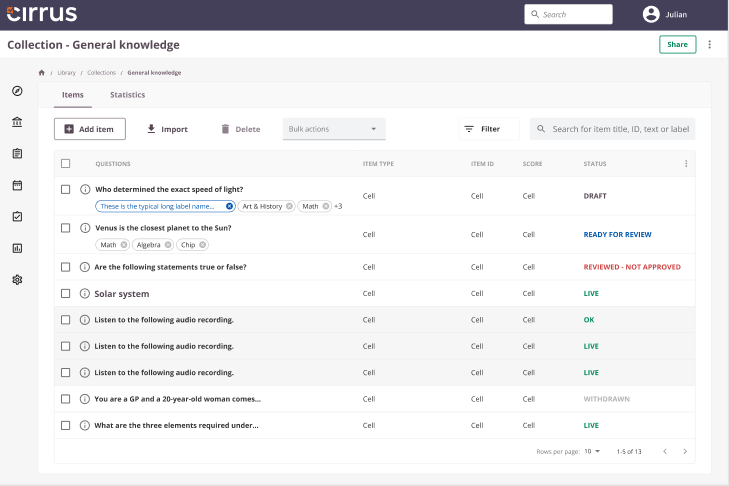
- System labels are available to all users in your environment and are shown in grey (see screenshot above).
- Item authors can add these labels from the Item overview screen within a collection.
Administering personal labels
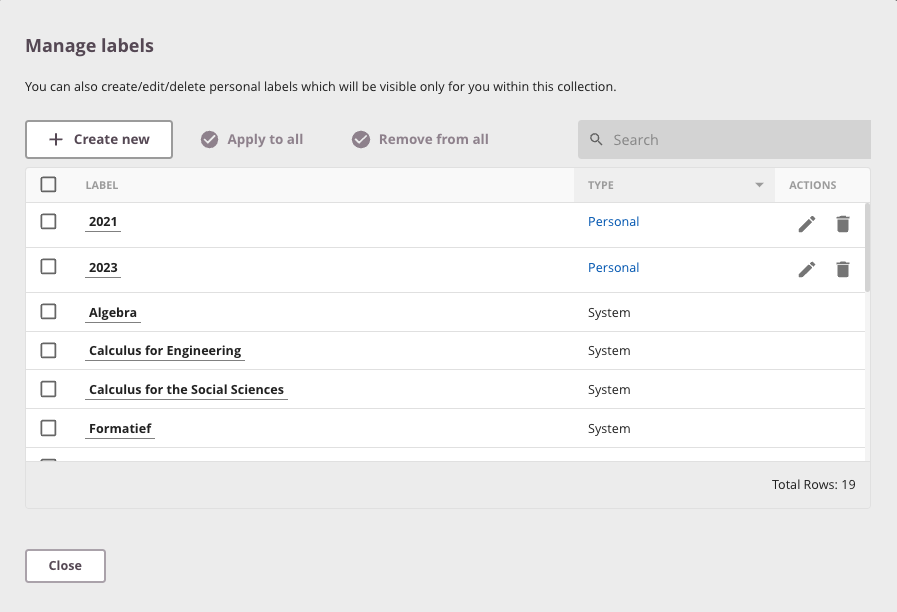
To manage personal labels, open a collection, click the three-dot menu in the upper right corner, and select Manage labels. Personal labels are shown in blue; system labels in grey. Only personal labels can be edited (using the pencil icon) or deleted (using the trash icon).
The Manage labels screen shows all available labels. Create a new personal label by clicking Create new.
Shortcuts available:
- Apply to all: Applies the selected label to all questions.
- Remove from all: Removes the selected label from all questions without deleting the label.
Apply a label
Select one or more questions using the checkbox, then select Bulk actions → Apply Labels. An overview similar to the label management screen appears, showing which labels are currently applied. Select the labels to apply and click Apply.

Remove a label
Select one or more questions using the checkbox, then select Bulk actions → Remove Labels. In the overview, select the labels to remove and click Remove.
Add a system label
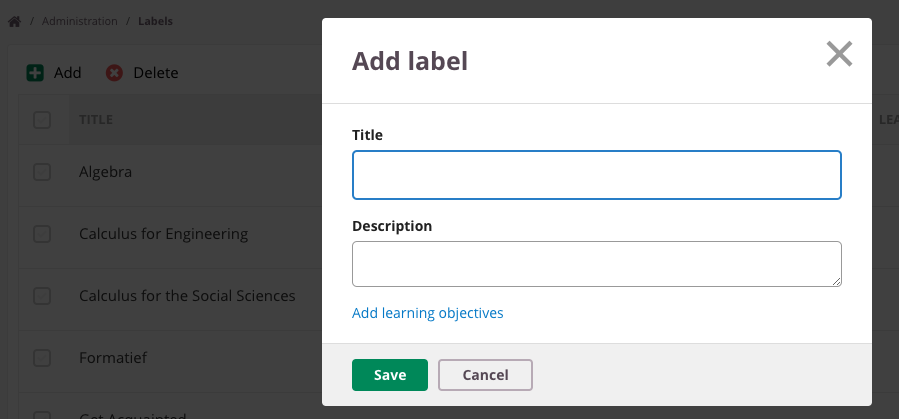
Go to Admin → Labels. Click Add to create a new label, enter a title at a minimum, and click Save.
Integrating labels with Learning Objectives
Labels can be linked to items and Learning Objectives in Cirrus. Once connected, an item associated with a Learning Objective automatically receives the corresponding label. This helps with Library filtering and question selection.
- Go to Admin → Labels → Edit → Add Learning Objectives.
- Labels associated with Learning Objectives appear in grey, similar to system labels.
- Labels manually assigned to questions cannot be linked to Learning Objectives. A message will indicate: "This label was manually assigned to question(s). You cannot connect it to learning objectives."
Note: Removing the link between a label and a Learning Objective will automatically remove that label from all items associated with that Learning Objective.
Create labels before importing items into your collection.
Delete a system label
Go to Admin → Labels, select the desired label(s), and click Delete.
Note: Labels that are currently in use cannot be deleted.
Tip: Via Library → Items, you can view all items and filter by label across collections. Exercise caution when adding system labels, as other users may have applied them in other locations.
Using labels during assessment creation
Labels applied in the Library continue to be useful during assessment creation.
During question selection and form creation, labels are displayed and can be used as search filters.