After reading this article you will know all ins and outs of Collections. You can add Collections and you will understand the usefulness of them in the further process of creating exams.
The Library is the home for all your items. You organise your items into Collections (also revered to as 'item banks').
For example, you can create collections by subject area, question type, learning objective, etc.
In this article we will look at:
- Your collection overview
- How to add a collection
- How to use a collection
Your collection overview

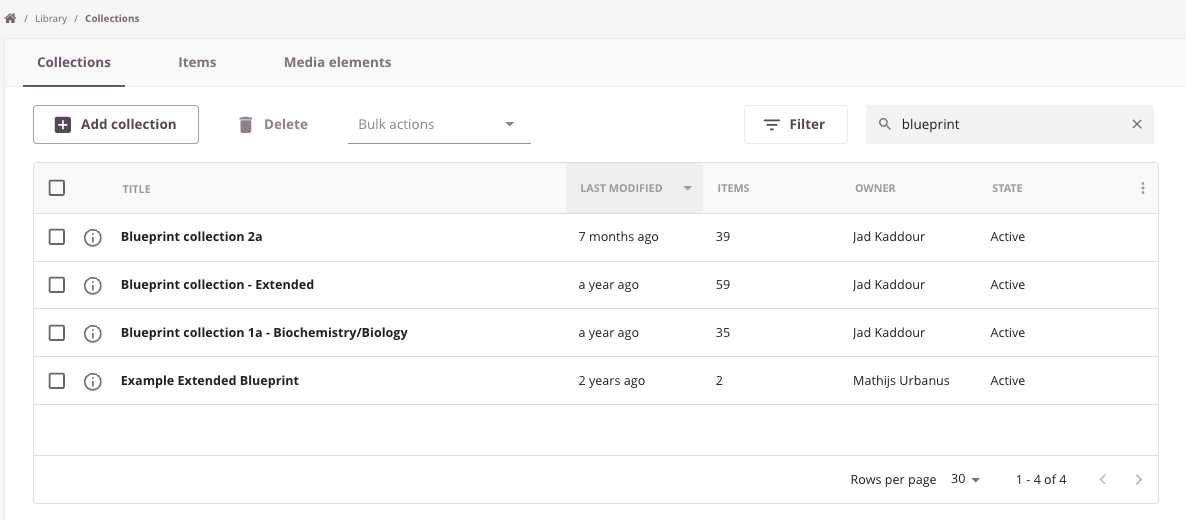
In the collection overview page:
- You see al your collections and the ones shared with you. Simple click a collection open it.
- You can filter your collections by using the filter button
- Use the Collections action menu-bar to Add, Delete, Archive and Unarchive.
- See important basic information such as Title, Last Modified date, number of questions in each collection.
- Check the Status of the collection
Let go through these options step by step.
Some actions depend on your Item and Collection role. These are setup under Admin > Roles > Collections by an administrator. Your role determines - for example - whether you can add or delete collections.
If you are unable to perform certain actions, consult a System Admin to help you.
How to add a new Collection

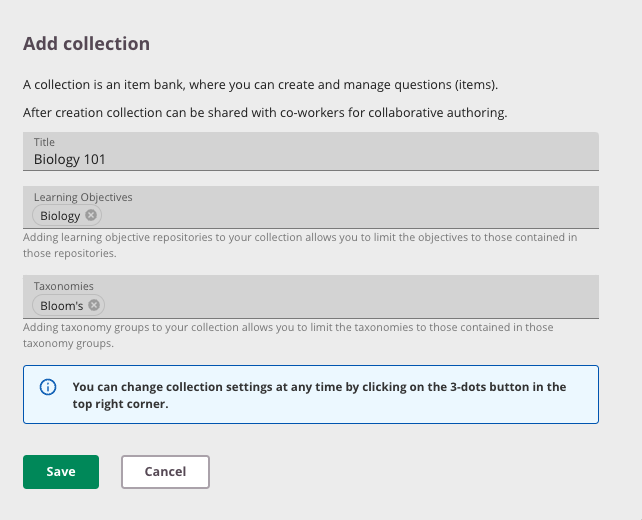
Click on 'Add collection' in the action menu-bar to add a new Collection.
A pop-up box will open, allowing you to enter a name for your collection, the associated learning objective and taxonomy repositories.
1. Title of your collection
Enter a Title or name for your Collection of questions (max 100 characters).
This field is mandatory.
2. Learning Objectives (LO)
Select a Learning Objective repository (optional) to associate with this collection. By doing so, you will make sure you do not see learning objectives that do not meet your subject.
3. Select a Taxonomy
Select a Taxonomy category (optional) to associate with this collection. By doing so, you make sure you do not see taxonomies that doesn't apply to the subject of your collection.
See 'Working with learning objectives' and 'Working with Taxonomies for more information.
Changing LO and Taxonomies of your collection
You can always change the title, Learning Objective and Taxonomy of you collection.
Simply go into your collection, click the 3 vertical dots at the right top corner button and click on 'Collection Settings'.
Here you can also change the ItemID prefix set for you collection. Also see 'The Cirrus ItemID - a unique and user friendly ID for each question'.
Deleting and Archiving Collections
You can Delete, Archive and Unarchive Collections.
Select one or more collections and pick your optioon from the action menu-bar:
- Deleting: Will move the Collection to your trashcan. It will be possible to restore it within 30 days. After that period all data will be deleted permanently.
- Archiving: Will archive the Collection so the data will not be lost. The Items of that collection will not show up to be selected when creating an assessment.
- Un-archiving: You can un-archive at any time so the Items are available again when creating an assessment.
Keep in mind that some actions depend on your Item and Collection role. These are setup under Admin > Roles > Collections by an administrator.
This role determines for example whether you can add or delete collections. If you are unable to perform certain actions, consult a System Admin.
How to use a Collection
How you set up a Collection is entirely up to you. You can create Collections with Items that meet personal needs or you can discuss a standardised workflow with you colleagues.
For example, you can create collections by subject area, question type, learning objectives, school year, etc.
Please note that the collections will be by default visible only for you, unless you share the collection with colleagues.